Today I am going to show you how to use Redux in a React application. Redux is arguably the most popular state management library today that you can use with react ( also can be used with many other libraries ). We are going to create a Simple Counter React Redux Application, User will be able to increment, decrement and reset the value of that counter.
I have created a fully working application using codesandbox.io. Feel free to interact with the application and take a look at the code.
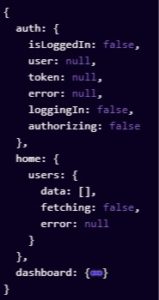
A Redux store resembles a JavaScript object with keys and values and all the application state is stored in that JavaScript Object like Store. Here is how a store usually looks like.
To learn how to use a Redux Store With React there are three main concepts that we have to understand.
1. Action
An Action is simple JavaScript Object that looks like this.
{
 type: SOME_ACTION_TYPE,
 data: 'Could be anything from a simple string to object and arrays'
}
An Action is used to describe if something happened or changed in your application. For example when a user logs in to your application, you will have to make an action for that change that would look something like this
{
 type: USER_LOGGED_IN,
 data: {
  id: 1,
  name: 'Jhon',
  email: '[email protected]'
 }
}
You can send any type of data in your action but the recommended way of writing actions is that you have a type and a data or payload key for that action.
Now that we know what actions are we are ready to use these actions to update our Redux Store.
To notify the Redux Store that an action took place we dispatch those actions. dispatch is function provided by the Redux Store and can be accessed in a number of different ways. For example if you have the instance of the store its self available to you, you can access the dispatch method like this store.dispatch(action).
There are more ways we can get our hands on to this handy dispatch method in a React Redux Application which we will discuss later.
2. Reducers
Reducers are pure functions such that there output is only dependent on the input to that function only and should always return the same output for same input. You can read more about pure functions here
When you call store.dispatch(action) a reducer function is called and that action is passed to that function as an argument. This is what a simple reducer looks like.
import { SET_COUNTER, RESET_COUNTER } from "./counter.action";

const initialState = {
  value: 0
};

const counter = (state = initialState, action) => {
  switch (action.type) {
    case SET_COUNTER:
      return {
        value: action.payload.value
      };

    case RESET_COUNTER:
      return {
        value: initialState.value
      };

    default:
      return state;
  }
};

export default counter;
As you can see the function named counter is our reducer. This functions gets the current state as the first parameter and the action as the second parameter.
Inside the function we have a case statement that checks the type of the action, If the type is SET_COUNTER it will set the value of the counter to what we have passed in our action. And if the type is RESET_COUNTER it will reset the value of the counter to its initial value that is stored inside the variable called initialState
To sum it all up we can now say that Reducers are responsible for receiving actions and then taking data from those actions and then updating the store.
Finally when you create your different reducers and actions you can combine those reducers to form a single combined reducer. Again redux gives us a function called combineReducers for that. Here is how we use it
import { combineReducers } from "redux";

// reducers
import counter from "./counter/counter.reducer";

const reducers = combineReducers({
  counter: counter
});

export default reducers;
combineReducer takes an object as the argument and this will define the shape of your store.
3. Store
Store is the actual store that contains all the data. This is how we can create a store instance that can be used by our React Application.
import { createStore, compose } from "redux";
import reducers from "./rootReducer";
const store = createStore(
  reducers,
  predefinedState
);
Now that we know what are the basic components of a Redux React Application are we can jump right in and start creating our brand new Redux powered React Application. We will use Create React App as a boilerplate for our application as it provides us the necessary tools to start developing a capable react application.
Store is then linked to the React application using a component Provider which is provided by the react-redux package, The store instance that we created above is then passed to this Provider component. This Provider component passes the store to the underlying application components using Context API of React.
import { Provider } from "react-redux";
...
function App() {
  return (

<div className="App">
      <Provider store={store}>
        <MyApp />
      </Provider>
    </div>

  );
}
const rootElement = document.getElementById("root");
ReactDOM.render(<App />, rootElement);
Now that we have setup our application to use the redux store we now need to use the data provided by the store in our application components, to do that we will use a function named connect provided by the react-redux library. connect is a Higher Order Component (HOC) that takes a normal component as input and returns us the connected component. Let’s look at an example of how the connect component is used generally.
import { connect } from "react-redux";
import Counter from "./Counter.jsx";
import { updateCounter, resetCounter } from "./counter.action";

const mapStateToProps = store => {
  return {
    counter: store.counter.value
  };
};

const mapDispatchToProps = dispatch => {
  return {
    updateCounter: payload => dispatch(updateCounter(payload)),
    resetCounter: () => dispatch(resetCounter())
  };
};

const ConnectedComponent = connect(mapStateToProps, mapDispatchToProps)(Counter);
export default ConnectedComponent;
As you can see above that the connect function takes two functions as arguments which we named mapStateToProps and mapDispatchToProps.
mapStateToProps function receives the instance of the store that we provided to the Provider component and then returns an object which contains the values required by the component. The underlying component will receive these values in its props. In our example component we only need the value counter from the store so we returned only that
const mapStateToProps = store => {
  return {
    counter: store.counter.value
  };
};
mapDispatchToProps function receives the dispatch function as an argument, mapDispatchToProps function should return an object of functions that will be used by the component later.
const mapDispatchToProps = dispatch => {
  return {
    updateCounter: payload => dispatch(updateCounter(payload)),
    resetCounter: () => dispatch(resetCounter())
  };
};
As you can see that we are passing our functions like updateCounter which return us the actions to the dispatch function, The reason for doing that is we will also be able to use this dispatch function inside our updateCounter and resetCounter functions as well. Some times we need to dispatch multiple actions from one such function and this technique proves to be very useful in such scenarios. Also if you return an action object from your updateCounter function it will automatically will get dispatched. Our underlying component will receive these functions in its props. Here is how our updateCounter function is defined
export const updateCounter = payload => {
  return dispatch => {
    // since we are getting the dispatch in the arguments
    // we can use this to dispatch more then one actions from
    // this action
    // dispatch(someOtherAction);
    return dispatch({
      type: SET_COUNTER,
      payload: payload
    });
  };
};
Finally we are ready to write our counter component and use our brand new redux store in it. Here is the code for our counter component.
import React, { Component } from "react";

export default class Counter extends Component {
  constructor(props) {
    super(props);
    this.increment = this.increment.bind(this);
    this.decrement = this.decrement.bind(this);
  }
  increment() {
    const { updateCounter, counter } = this.props;
    const value = counter + 1;
    updateCounter({
      value: value
    });
  }
  decrement() {
    const { updateCounter, counter } = this.props;
    const value = counter - 1;
    updateCounter({
      value: value
    });
  }
  render() {
    const { counter, resetCounter } = this.props;
    return (
      <div className="counter">
        <h2>{counter}</h2>
        <div className="actions">
          <div className="decrement">
            <button onClick={this.increment}>+</button>
          </div>
          <div className="reset">
            <button onClick={resetCounter}>Reset</button>
          </div>
          <div className="increment">
            <button onClick={this.decrement}>-</button>
          </div>
        </div>
      </div>
    );
  }
}
Counter.jsx is a pretty straight forward component. It will counter,updateCounter and resetCounter in its props. When the plus button is clicked we will call the updateCounter function and will pass the incremented value and same goes for the decrement button.
So there you have it folks a simple React Redux Application. Did I miss something ? Or you have some suggestions ? Feel free to leave a comment in any case.
Excellent article.